How to Install and Remove Floor Graphics
MARCH 25, 2020| SpeedProVinyl floor graphics are well-known for their ability to add visual appeal to floors, with floor logo decals, wayfinding graphics and other images improving the aesthetic of a space. No matter how attractive your floor graphics are, improper installation can reduce their visual appeal. For example, a floor graphic that hasn’t been installed correctly can come loose or tear. As you’ll want to make your floor graphics look as appealing as possible, you should know how to install and remove them properly.
How to Apply the Graphic
To apply a graphic, you need to follow a few quick guidelines to make sure that the installation is done correctly. Below you can find out all of the actions you need to take to install indoor or outdoor floor decals:
Prepare the Surface
Before you begin the installation process, you must get the surface ready for the installation process. Preparing the surface largely comes down to cleaning it and making sure there are no contaminants that harm the graphic’s durability. A dirty surface can harm the graphic’s appearance and make the decal come loose prematurely.
The following steps will ensure that the surface has been properly prepared for the installation of your floor decals:
- Clean the floor. Your first step should be to clean the floor properly with whatever cleaning supplies are appropriate for the surface’s material. It’s best practice to clean more of the floor than you’ll actually need to place the graphics. Cleaning a few inches past what you need will give your floor decal some wiggle room with where you place it on the ground.
- Wipe down the surface. Once the cleaning is finished, it’s a good idea to dry off the floor before applying the graphics. It’s best to use a lint-free towel that dries the area, along with getting rid of any remaining grit that wasn’t removed during the cleaning process.
- Get rid of remaining oil or grease. If you suspect that your floor has grease or oil on it, you can remove the contaminants with a rag dipped in rubbing alcohol. This rubbing alcohol quickly removes grease that couldn’t be removed with regular cleaning supplies.
- Test the surface. If your surface has any paint or other kinds of coverings on it, you’ll want to test it to make sure the floor graphic’s adhesive won’t remove the paint or other material from the surface.
Installing the Graphics
Most floor graphics will come with manufacturer-provided installation instructions that let you know what you need to do. Obviously, following these directions is crucial, but there are also a few more guidelines you should follow to ensure that your decals install properly either for outdoor or indoor floor decals.
Outdoor Decal Installation
An outdoor decal is specially designed to protect against the weather. To make sure the decal looks as good as possible outdoors, follow the tips below:
- Don’t cover temperature relief channels. If you install on concrete or asphalt, you should make sure that you don’t cover any temperature relief channels in the material. If these surfaces are sealed off, the asphalt or concrete surface will crack, which, in turn, will harm your graphics.
- Avoid installing on condensation holding zones. You should make sure not to install a graphic over an area where water tends to fill up, as the condensation can harm the graphics. Either move the decal to another area or fill in the surface with appropriate material.
- Install with the strongest adhesive and matte protection. For a floor graphic to be as durable as possible, you’ll want to select only the strongest adhesives. Additionally, extra matte protection ensures that the decal isn’t harmed by UV rays, rain or ice.
Indoor Decal Installation Tips
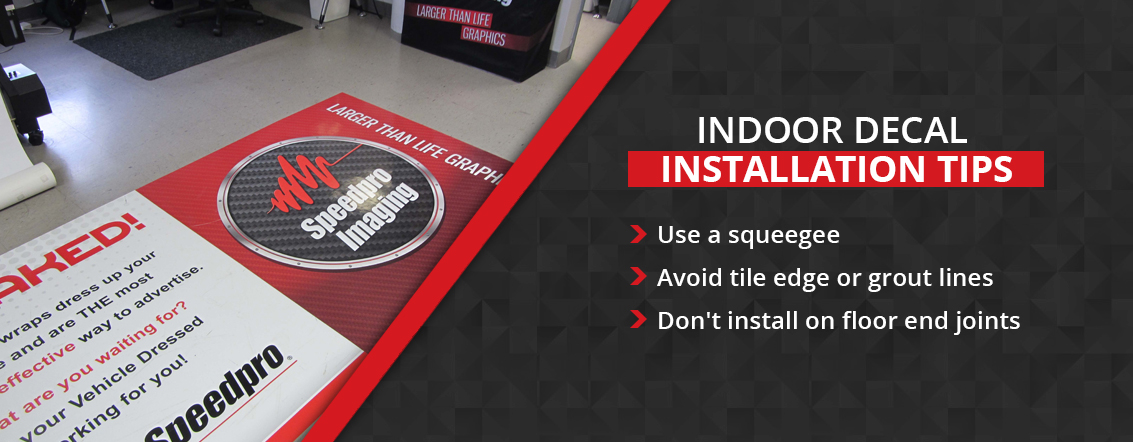
Indoor decal installation is an easy, stress-free process. There are a few tips that you should follow to set your permanent or temporary floor decals up for success:
- Use a squeegee. When you install floor graphics, it’s best to use a squeegee to apply it, as air pockets often form when people try to apply the graphics with their hands. For optimal pressure and the smoothest, air pocket free final decal, a squeegee is the best device to use to install it.
- Avoid tile edge or grout lines. If you install on vinyl or tile, it’s important you don’t place the graphic on grout lines or tile edges. These areas tend to let in air bubbles, causing the floor decals to peel, reducing the lifespan of the graphic.
- Don’t install on floor end joints. For graphics installed on wood, it’s crucial to not install the decals on floor end joints. These floor end joints will end up harming the appearance of the floor graphics, as they add bumps to an area that should be smooth.
How Long to Let the Decal Sit Before People Walk on It
It’s a good idea to let a decal sit for at least 24 hours for the adhesive to bond with the surface. During this time, no one should interact with the decal. After the 24 hours is over, the decal can be walked on without any threat to it being damaged.
How to Remove Floor Graphics Safely
To avoid harming the surface that you’ve installed your temporary floor decals onto, you can begin by peeling it off with your fingers. In the easiest removal process, the decal will come off without any specialized materials. In most cases, you should be able to peel all of it off by getting a grip on it with your hand.
If you do hit resistance while peeling, or if you can’t get a grip on it, you can use a plastic card, like a credit card, to create a wedge between the vinyl floor graphics and the surface. It’s best to wedge the card at the edge of the decal, moving it back forth with a light amount of pressure to make the gap large enough that you can peel the rest of the decal off easily.
For times when you’re having difficulty peeling the decal off even with a card, you should never use a sharper material that could end up damaging the floor surface, like a knife. Instead, you should use a blow dryer on the decal to loosen the decal’s adhesive with heat.
How to Clean the Floors Afterwards to Remove Any Residue
After a floor decal has been removed entirely, clean the floor so there’s no adhesive residue left over. This residue will often harm the appearance of the floor. To remove the residue, you can typically use soapy water to scrub it away, but if it doesn’t come off, rubbing alcohol will usually do the trick. Once the residue is cleaned off, all you have to do is dry off the surface.
Choose SpeedPro for Your Floor Graphic Needs
Whether you need small or large floor decals, SpeedPro has you covered. We use only the most high-quality materials in all of the floor graphic vinyl decals we produce to make the installation and removal processes as seamless as possible.
With a nationwide network of studios at your back, you can be confident that you’ll receive floor graphics that meet your needs exactly. Find your local studio today to speak to a qualified representative about what SpeedPro can do for you.